My truck, a work in progress
Tuesday, July 10, 2007
This post will be somewhat ironic, given that my previous post began with pictures of my re-worked intake manifold, but sometimes the unexpected hapens.
About a year ago I received an unsolicited email from Leen Steed, machinist, designer, and owner of SteedSpeed.com. Leen was asking if I knew anyone who would be interested in 22RE turbo exhaust manifolds, and sent me a link to some pictures of his work. His manifolds looked great, and while I didn't need one myself I said I would forward his info on to the the 22RTE-Trucks email list.
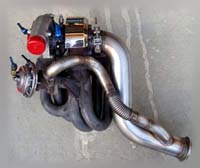
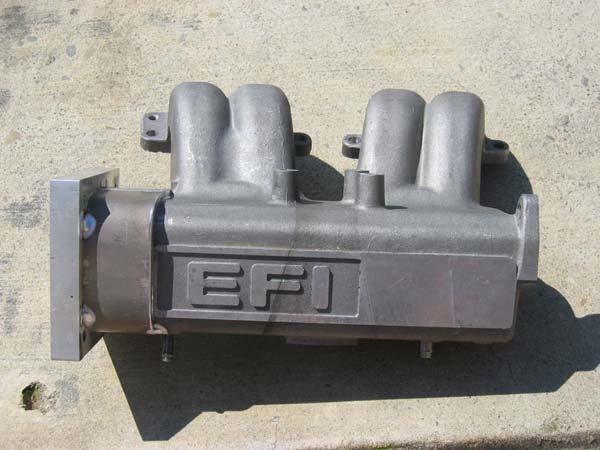
However, in looking through his pictures I also noticed an amazing custom 20R EFI manifold on a Celica Leen had prepped for racing:
It was almost a perfect mix of function and eye candy, exactly the sort of thing I have a weakness for. (And I won't even mention the crazy twin turbo setup he has on that thing :) ) I wanted one of those intakes...but Leen said it had some quirks, and Leen was convinced he could do a better job and build one that was a bit easier to package/fit under the hood. And thus began a long, extended conversation about bringing an improved intake manifold/plenum to the 22RE/RTE.
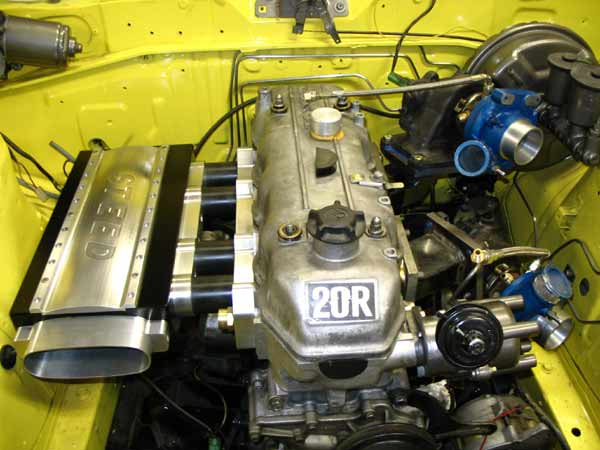
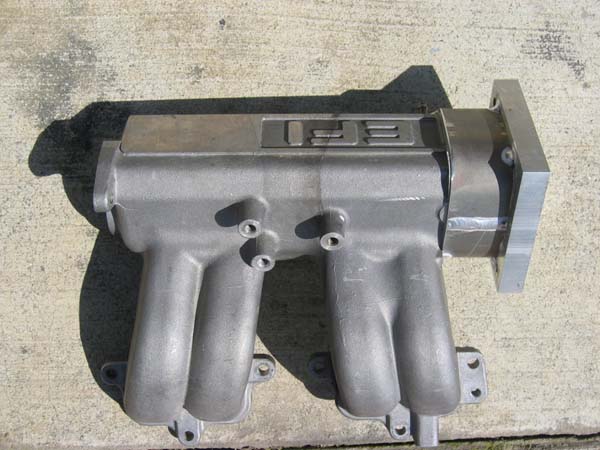
After a few false starts, Leen hit upon a design that retained the stock lower intake manifold while, which has straight runners with large cross sections, and ditched the restrictive upper plenum. His design also incorporated some generous built-in velocity stacks, to help the incoming make that hard turn into the lower manifold:

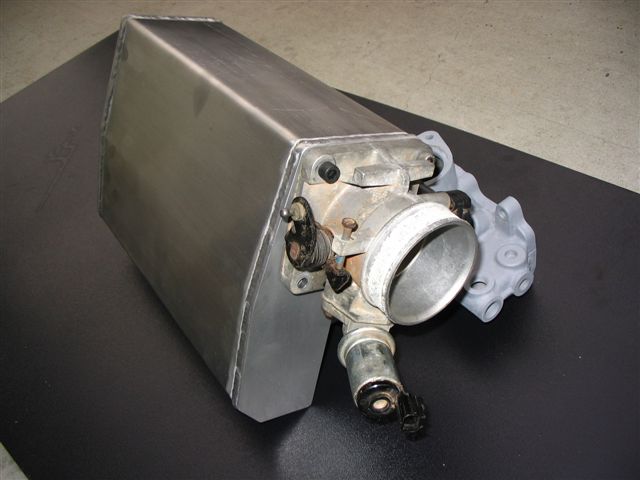
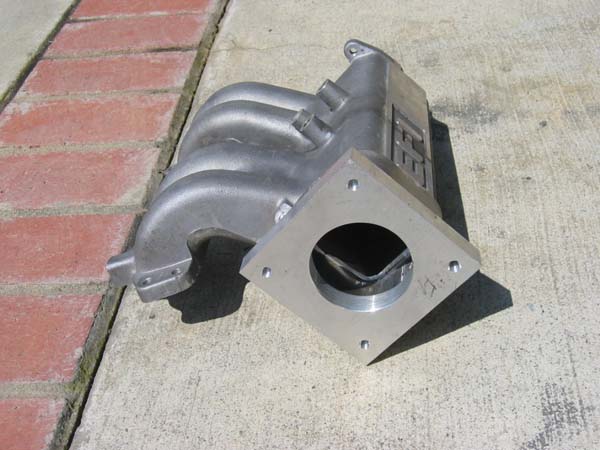
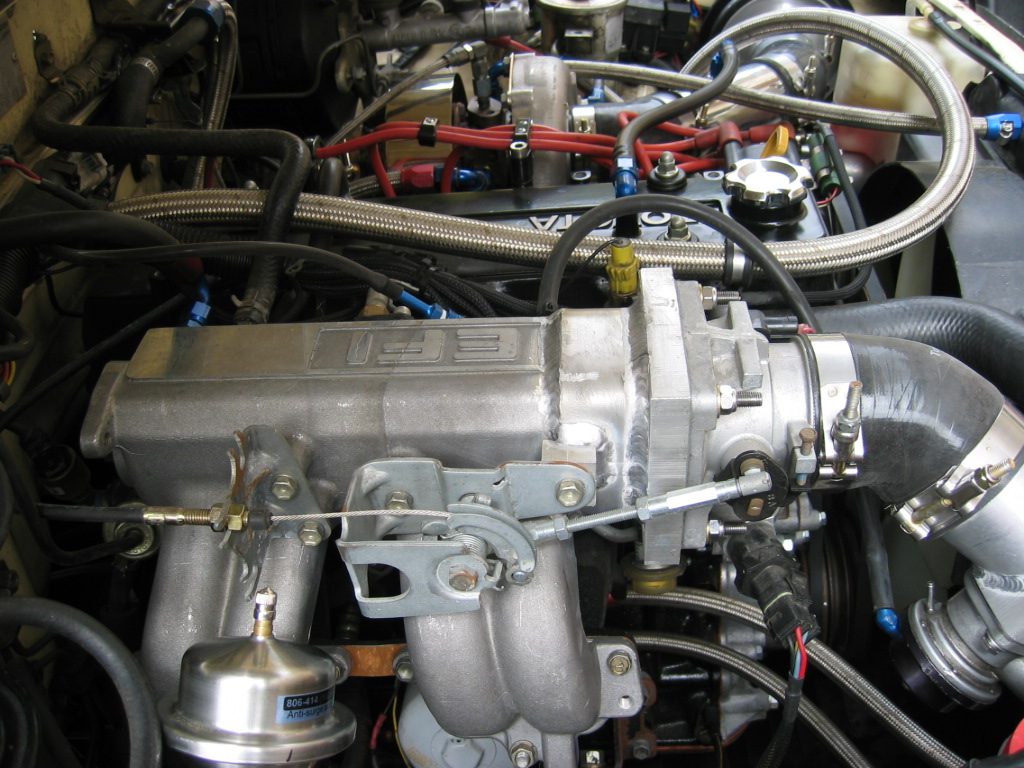
In early July, I finally got a chance to install Leen's latest prototype, and I think he has a design that's ready for prime-time:
I just got it installed last night, so I have yet to get it on the dyno, but I felt solid performance gains above 4k rpm, and significant gains above 5k rpm; obviously, the biggest gains are going to be found when the engine is moving the most air. And I saw no loss of low- or mid-range power, which was something I feared.
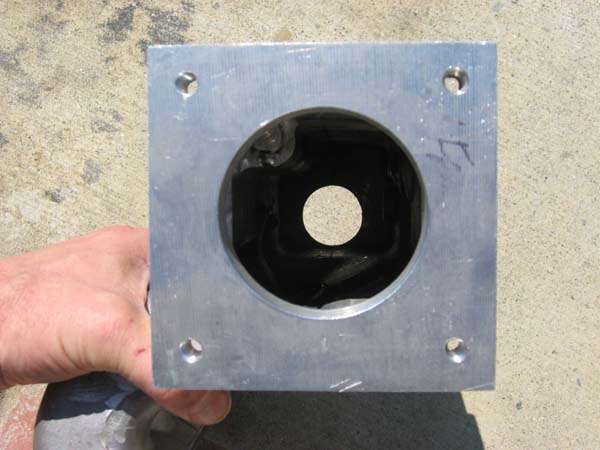
Installation was fairly straightforward, with the exceptions that a) i had to relocate the fuel pressure regulator to the front end of the fuel rail, as the manifold could not be installed with the FPR in its stock location; and b) I am not running the stock EFI, so my system probably represents the simplest case for installation, as I only have to account for one sensor and have remote mounted all of my vacuum hoses to a separate vacuum manifold on the firewall. And c) no, this isn't CARB-approved/smog-legal.
Unanswered questions: will this work or can this be adapted to work on a 22RE with stock EFI? Will this yield any performance gains on a 22RE? How much will this cost?
My best guesses are that you could probably adapt this to a 22RE, but it's going to be a lot of work. I am not sure if the performance gains are worth the effort on a non-turbo motor, as there are other, easier things you can do that will yield more bang-for-the-buck. Remember, this sort of manifold gives the best results when you have over-stuffed your stock manifold with air; this is rarely the case on a normally aspirated 22RE. However on a turbo motor -- specifically, on my turbo motor - it works very, very well. I'll post some more details after I get it dyno'd in a few weeks.
If you are interested, contact him. He's said the price will be around US$475. Again, this is not exactly a bolt-on, but it is pretty damn cool, which is why I'm posting this. After all, very few people are actively developing new performance parts for these motors.
For more info on this project, contact Leen Steed, SteedSpeed.com. Leen also makes an affordable, CNC'd 22RE turbo exhaust manifold. More pictures of his work can be viewed here.
About a year ago I received an unsolicited email from Leen Steed, machinist, designer, and owner of SteedSpeed.com. Leen was asking if I knew anyone who would be interested in 22RE turbo exhaust manifolds, and sent me a link to some pictures of his work. His manifolds looked great, and while I didn't need one myself I said I would forward his info on to the the 22RTE-Trucks email list.
However, in looking through his pictures I also noticed an amazing custom 20R EFI manifold on a Celica Leen had prepped for racing:
It was almost a perfect mix of function and eye candy, exactly the sort of thing I have a weakness for. (And I won't even mention the crazy twin turbo setup he has on that thing :) ) I wanted one of those intakes...but Leen said it had some quirks, and Leen was convinced he could do a better job and build one that was a bit easier to package/fit under the hood. And thus began a long, extended conversation about bringing an improved intake manifold/plenum to the 22RE/RTE.
After a few false starts, Leen hit upon a design that retained the stock lower intake manifold while, which has straight runners with large cross sections, and ditched the restrictive upper plenum. His design also incorporated some generous built-in velocity stacks, to help the incoming make that hard turn into the lower manifold:
In early July, I finally got a chance to install Leen's latest prototype, and I think he has a design that's ready for prime-time:
I just got it installed last night, so I have yet to get it on the dyno, but I felt solid performance gains above 4k rpm, and significant gains above 5k rpm; obviously, the biggest gains are going to be found when the engine is moving the most air. And I saw no loss of low- or mid-range power, which was something I feared.
Installation was fairly straightforward, with the exceptions that a) i had to relocate the fuel pressure regulator to the front end of the fuel rail, as the manifold could not be installed with the FPR in its stock location; and b) I am not running the stock EFI, so my system probably represents the simplest case for installation, as I only have to account for one sensor and have remote mounted all of my vacuum hoses to a separate vacuum manifold on the firewall. And c) no, this isn't CARB-approved/smog-legal.
Unanswered questions: will this work or can this be adapted to work on a 22RE with stock EFI? Will this yield any performance gains on a 22RE? How much will this cost?
My best guesses are that you could probably adapt this to a 22RE, but it's going to be a lot of work. I am not sure if the performance gains are worth the effort on a non-turbo motor, as there are other, easier things you can do that will yield more bang-for-the-buck. Remember, this sort of manifold gives the best results when you have over-stuffed your stock manifold with air; this is rarely the case on a normally aspirated 22RE. However on a turbo motor -- specifically, on my turbo motor - it works very, very well. I'll post some more details after I get it dyno'd in a few weeks.
If you are interested, contact him. He's said the price will be around US$475. Again, this is not exactly a bolt-on, but it is pretty damn cool, which is why I'm posting this. After all, very few people are actively developing new performance parts for these motors.
For more info on this project, contact Leen Steed, SteedSpeed.com. Leen also makes an affordable, CNC'd 22RE turbo exhaust manifold. More pictures of his work can be viewed here.
Wednesday, April 25, 2007
Well, my life got busy, and I sort of became an absentee landlord to my 22RTE site. I'll try to bring things up to date without taking too much time.
Currently, the truck is running great! Here's a roundup of the mods since I last posted:
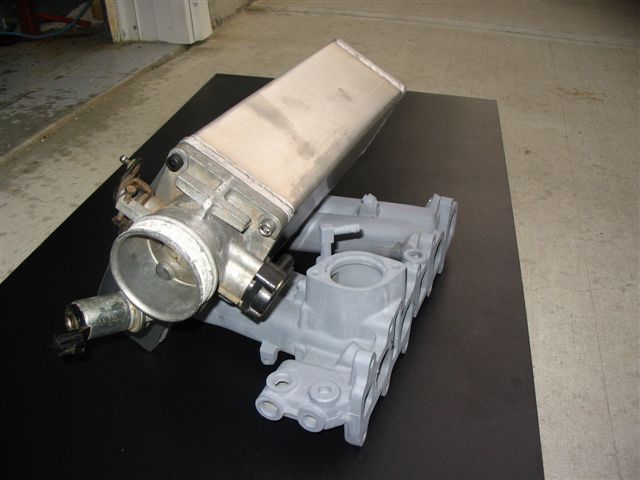
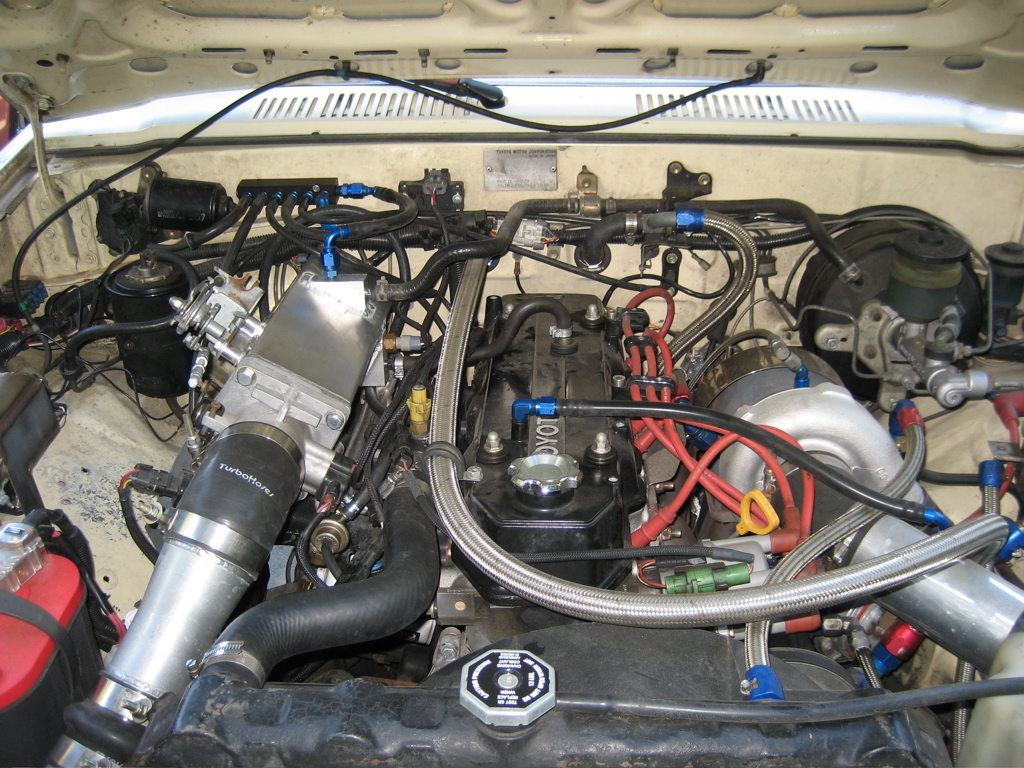
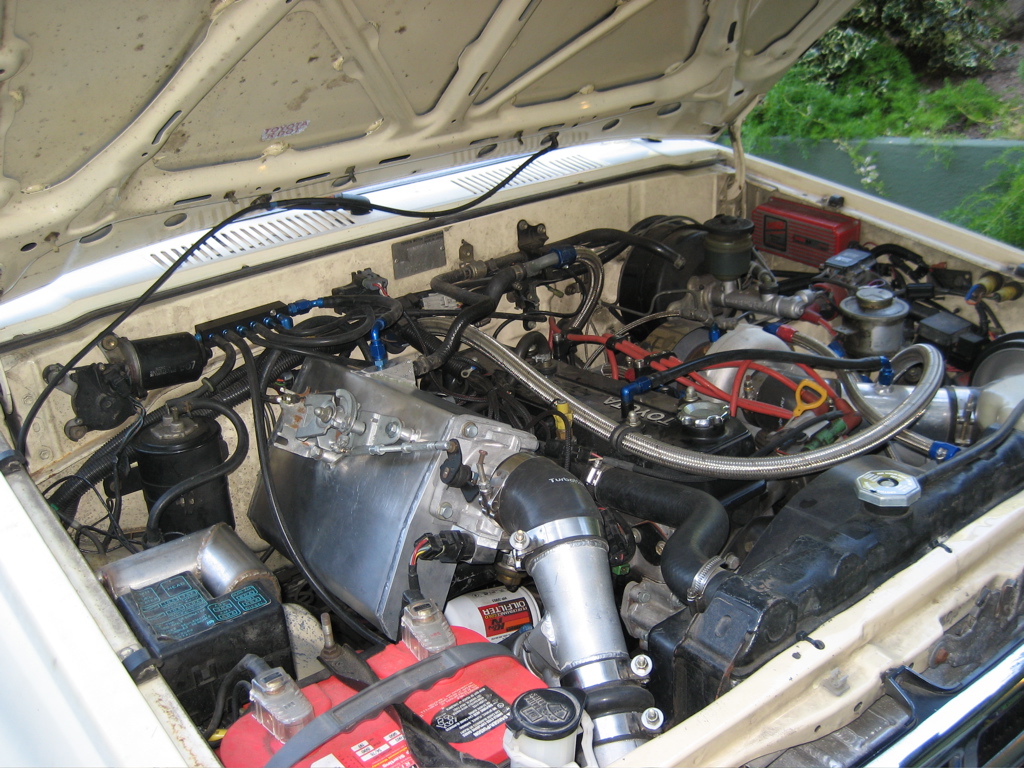
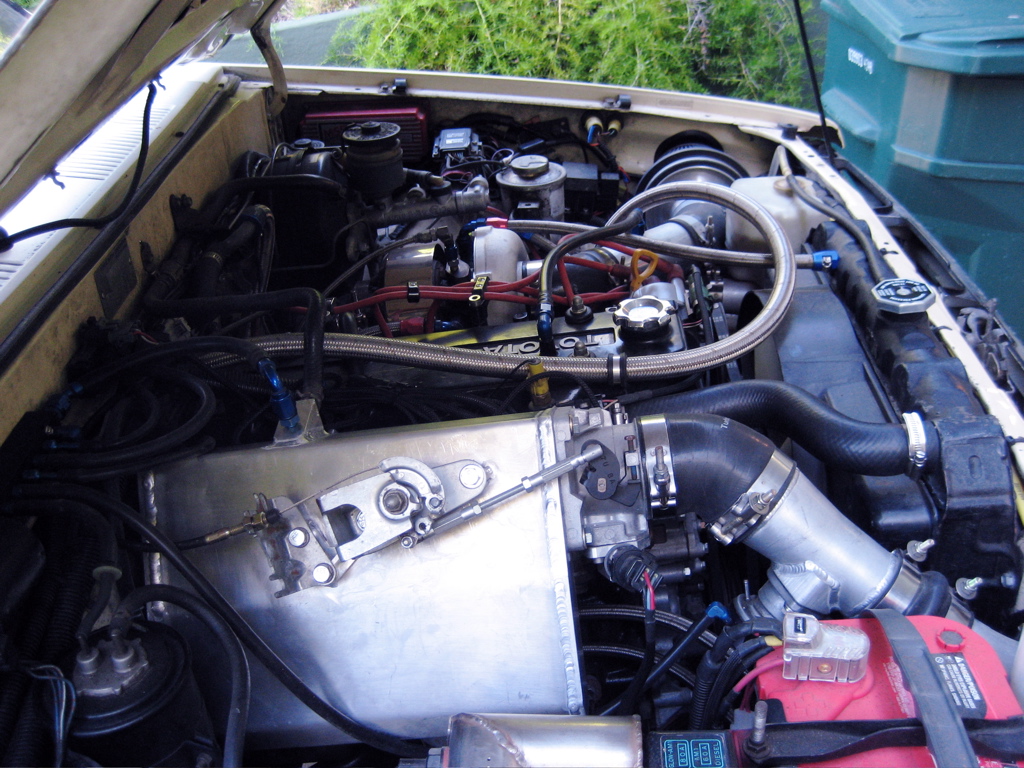
1. Reworked upper intake manifold. As I previously documented, I am running a 65MM TB from a 1998 Ford Explorer. Unfortunately, the opening in the stock intake plenum cannot be opened up beyond 62MM. So I cut the stock flange off a spare late model intake plenum and fabbed a new nose with a 65MM hole:
Compare the opening in this picture with the restriction visible in the bottom manifold in the following picture.
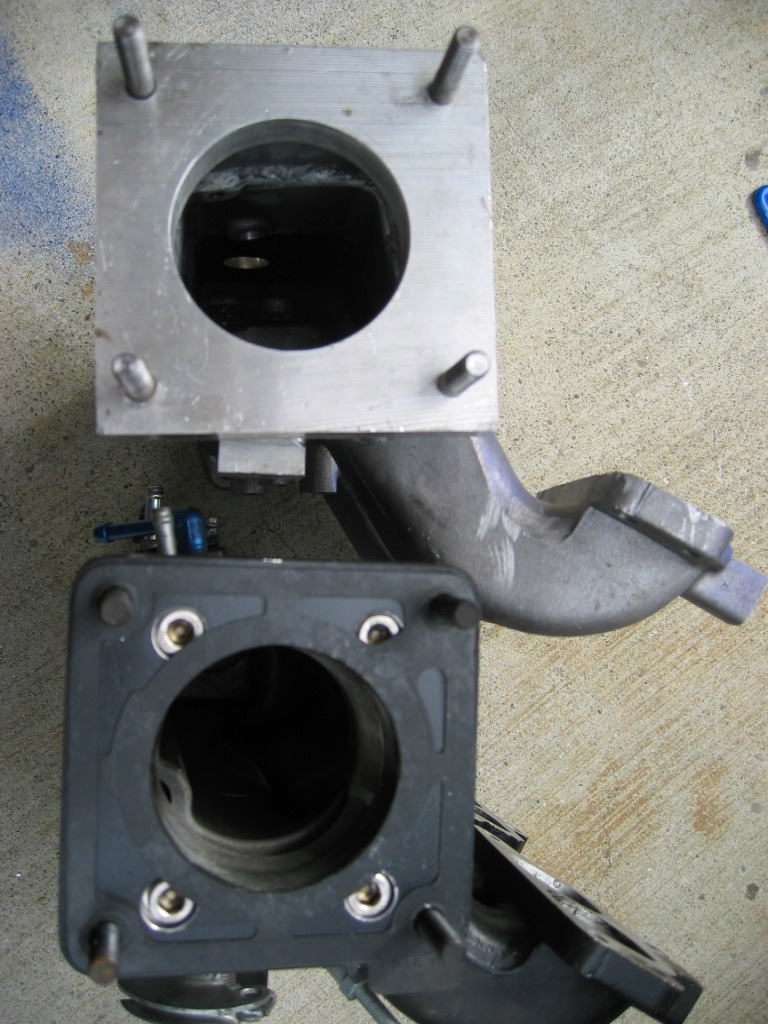
Big difference!
The finished manifold.
2. OK, with the manifold reworked, it was time to go after the old intercooler, which wasn't exactly what I wanted.
First, a quick review:
Intercooler #1:
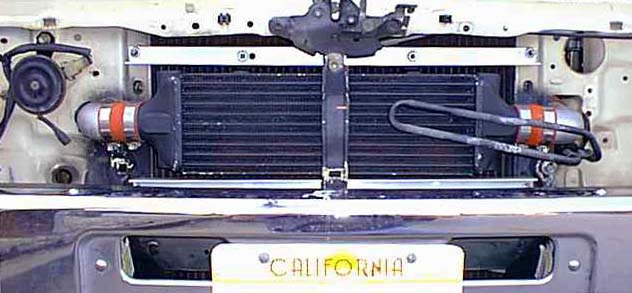
Intercooler #2:
And here's intercooler #3:
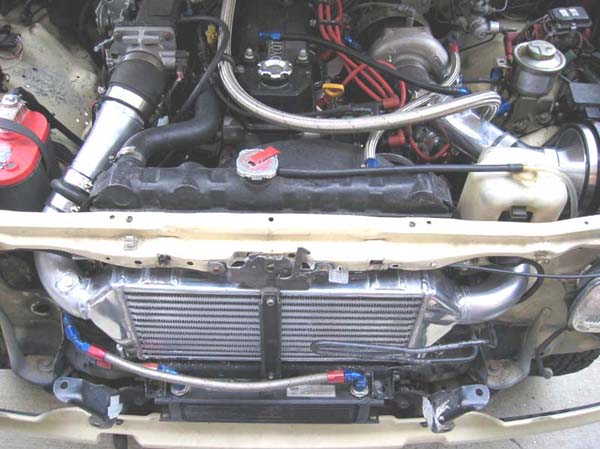
I picked this intercooler up from Street Imports - it's their 18" X 9" X 2". It was a tight fit, and I had to cut their hose ends off and weld my pipes directly to the outlet tanks, but once fitted, it has proved to be a big improvement over intercooler #2. In addition to the reworked pipes and a more efficient design, it also allows me to use the stock vertical hood latch brace, which I couldn't do with the previous intercooler. If you are in the market for a 22RTE intercooler, I believe one of the ones offered by Street Imports would be a good fit, and you could certainly use one of the smaller ones for an easier install. They are also reasonable priced.
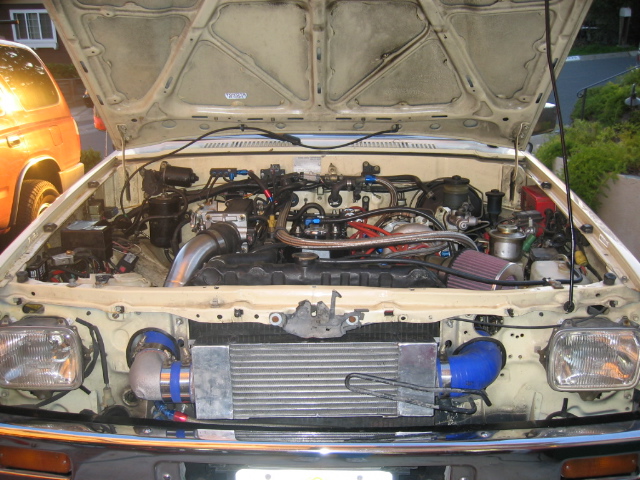
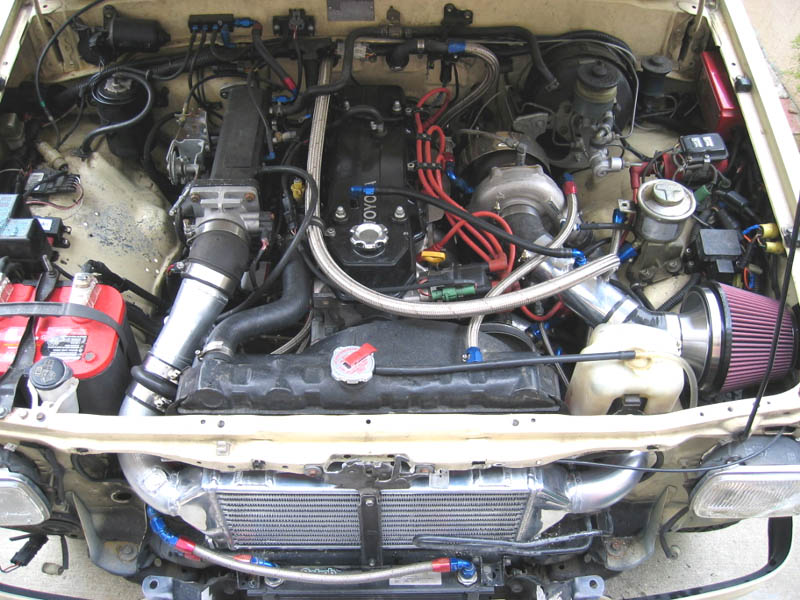
OK, so at more or less at the same time I was reworking these components, I got an out-of-the-blue email from Rick Tapp, owner/operator of Full Boogie Racing. Rick owned a turbo Toyota truck and had read through my site, and suggested that the turbo I was currently using was too small. After talking to him, I decided to try one of the Precision Turbo & Engine/Garrett SC34R T3/T04E turbos (link takes you to to Rick's page for this turbo) that he sells. The specific one we used had a 57 trim compressor wheel, a twin ball bearing center section, and a .63 A/R (Stage III) exhaust wheel. It is nominally rated to support 540 hp. I don't have any separate pics, but it looks like any other large compressor Garrett T3/T4 turbo. Happily, it bolted up to all of my existing pipe work, although I also took this opportunity to fashion a cold air intake, positioning the air cleaner almost near the fender and cutting vent holes in the inner fender (picture below is with the old plenum):
So, armed with a new turbo, new intake, and new intercooler, it was time to retune and re-dyno. Drum roll, please.....
Ta da:
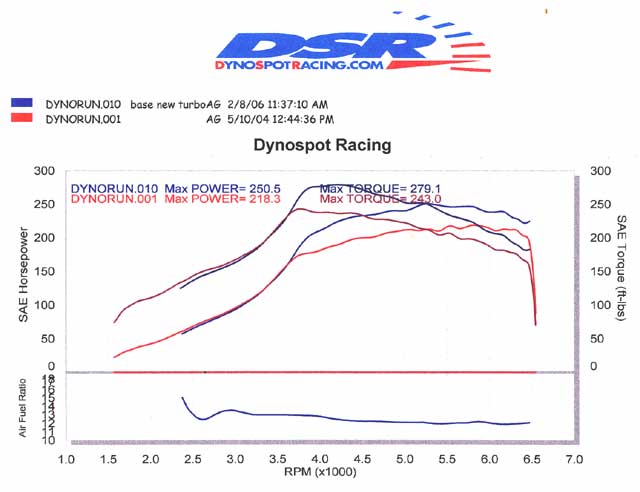
That's 250 rear wheel HP and 279 ft. lbs torque on 91 octane pump gas, or more than double the stock power output :-) Not bad, not bad at all -- the truck really kicks some ass, and is a lot of fun to drive. If you look closely at the above dyno results, you'll see that they are graphed above the previous results, and show a full 35 rwhp/37 ft. lbs torque improvement. That's pretty solid, IMHO.
I'm going to end this long post now, as it's a good summary of the last couple of years. I do have one or two more tricks up my sleeve for this motor, but I'll save those for another post. Thanks for your patience, and thanks for reading.
Cheers,
Jeff
Currently, the truck is running great! Here's a roundup of the mods since I last posted:
1. Reworked upper intake manifold. As I previously documented, I am running a 65MM TB from a 1998 Ford Explorer. Unfortunately, the opening in the stock intake plenum cannot be opened up beyond 62MM. So I cut the stock flange off a spare late model intake plenum and fabbed a new nose with a 65MM hole:
Compare the opening in this picture with the restriction visible in the bottom manifold in the following picture.
Big difference!
The finished manifold.
2. OK, with the manifold reworked, it was time to go after the old intercooler, which wasn't exactly what I wanted.
First, a quick review:
Intercooler #1:
Intercooler #2:
And here's intercooler #3:
I picked this intercooler up from Street Imports - it's their 18" X 9" X 2". It was a tight fit, and I had to cut their hose ends off and weld my pipes directly to the outlet tanks, but once fitted, it has proved to be a big improvement over intercooler #2. In addition to the reworked pipes and a more efficient design, it also allows me to use the stock vertical hood latch brace, which I couldn't do with the previous intercooler. If you are in the market for a 22RTE intercooler, I believe one of the ones offered by Street Imports would be a good fit, and you could certainly use one of the smaller ones for an easier install. They are also reasonable priced.
OK, so at more or less at the same time I was reworking these components, I got an out-of-the-blue email from Rick Tapp, owner/operator of Full Boogie Racing. Rick owned a turbo Toyota truck and had read through my site, and suggested that the turbo I was currently using was too small. After talking to him, I decided to try one of the Precision Turbo & Engine/Garrett SC34R T3/T04E turbos (link takes you to to Rick's page for this turbo) that he sells. The specific one we used had a 57 trim compressor wheel, a twin ball bearing center section, and a .63 A/R (Stage III) exhaust wheel. It is nominally rated to support 540 hp. I don't have any separate pics, but it looks like any other large compressor Garrett T3/T4 turbo. Happily, it bolted up to all of my existing pipe work, although I also took this opportunity to fashion a cold air intake, positioning the air cleaner almost near the fender and cutting vent holes in the inner fender (picture below is with the old plenum):
So, armed with a new turbo, new intake, and new intercooler, it was time to retune and re-dyno. Drum roll, please.....
Ta da:
That's 250 rear wheel HP and 279 ft. lbs torque on 91 octane pump gas, or more than double the stock power output :-) Not bad, not bad at all -- the truck really kicks some ass, and is a lot of fun to drive. If you look closely at the above dyno results, you'll see that they are graphed above the previous results, and show a full 35 rwhp/37 ft. lbs torque improvement. That's pretty solid, IMHO.
I'm going to end this long post now, as it's a good summary of the last couple of years. I do have one or two more tricks up my sleeve for this motor, but I'll save those for another post. Thanks for your patience, and thanks for reading.
Cheers,
Jeff
Monday, May 10, 2004
Part 16: Dyno numbers...(5-10-2004)
Just got back from Dynospot Racing, a local dyno shop, and I have some numbers to share for the turbo truck:
The max numbers are [...drum roll...]: 222.4 hp, 243 ft. lbs. @ 15 psi., as measured at the rear wheels. :-)

I am pretty pleased, as these numbers were obtained on 91 octane pump gas! This thing is a blast to drive, and makes me want to find some speed rated light truck tires, if there is such a thing.
When I first started this project, I felt that it might be possible to deliver as much as 300 hp to the rear wheels on pump gas and turbo alone. Obviously, it wasn't possible to run enough boost and advance on pump gas to do that, at least not by me. For the record, I have no doubt that with racing fuel I could easily run enough boost and advance to make 300 wheel hp...but that wasn't what I was after. I wanted a truck that made turn-key power on pump gas, and I'm pretty pleased with what I have.
The motor only has 1000 miles on it, so I may see another 5-10 hp once the rings fully seat. Also, I've seen all sorts of numbers tossed around for driveline losses on 4x4's, but even a middle of the road number like 25% puts me at 300 hp at the flywheel, which is impressive. I think any way you measure it, I have more than doubled the stock 136 flywheel hp, which is pretty damn good. This motor rocks! Kudos to Tim @ D.O.A. for building a solid, deep-breathing platform utilizing his own custom head porting and turbo cam grind. And while some of these parts came right off the shelf, many parts (such as the throttle body + linkage, intercooler setup, and the exhaust, to name a few) had to be made by hand. Building this motor has been a lot of work! I don't know if I'd do it again, but it's pretty fun to drive the end result :-)
So what's next? Driving it and enjoying it! And if I ever get the urge for more, there's always water injection (even if it does violate my "only pump gas" rule) ;-)
-Jeff
Just got back from Dynospot Racing, a local dyno shop, and I have some numbers to share for the turbo truck:
The max numbers are [...drum roll...]: 222.4 hp, 243 ft. lbs. @ 15 psi., as measured at the rear wheels. :-)
I am pretty pleased, as these numbers were obtained on 91 octane pump gas! This thing is a blast to drive, and makes me want to find some speed rated light truck tires, if there is such a thing.
When I first started this project, I felt that it might be possible to deliver as much as 300 hp to the rear wheels on pump gas and turbo alone. Obviously, it wasn't possible to run enough boost and advance on pump gas to do that, at least not by me. For the record, I have no doubt that with racing fuel I could easily run enough boost and advance to make 300 wheel hp...but that wasn't what I was after. I wanted a truck that made turn-key power on pump gas, and I'm pretty pleased with what I have.
The motor only has 1000 miles on it, so I may see another 5-10 hp once the rings fully seat. Also, I've seen all sorts of numbers tossed around for driveline losses on 4x4's, but even a middle of the road number like 25% puts me at 300 hp at the flywheel, which is impressive. I think any way you measure it, I have more than doubled the stock 136 flywheel hp, which is pretty damn good. This motor rocks! Kudos to Tim @ D.O.A. for building a solid, deep-breathing platform utilizing his own custom head porting and turbo cam grind. And while some of these parts came right off the shelf, many parts (such as the throttle body + linkage, intercooler setup, and the exhaust, to name a few) had to be made by hand. Building this motor has been a lot of work! I don't know if I'd do it again, but it's pretty fun to drive the end result :-)
So what's next? Driving it and enjoying it! And if I ever get the urge for more, there's always water injection (even if it does violate my "only pump gas" rule) ;-)
-Jeff
Friday, May 07, 2004
Part 15: Tuning day (5-6-2004)
Spent a few hours with Dan Fodge yesterday tuning the truck (Fodge Engineering, 3250 Unit H, Monier Circle, Rancho Cordova CA, (916) 851-9111). We didn't do any dyno pulls, but we did do about 2 hours of road tuning. The motor is now running very well -- 15 pounds of boost with no pinging, and plenty of acceleration, and max EGTs of ~1510°F under sustained boost. This is a stable and workable tune. Hooray!!
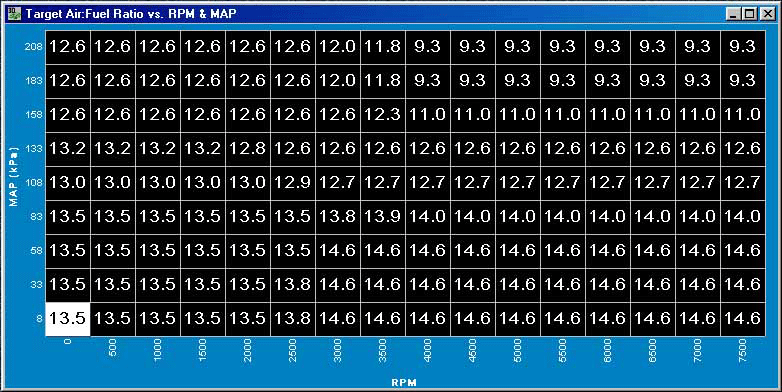
I'm posting some screen shots of the air/fuel, volumetric efficiency, and spark tables because someone may be curious.

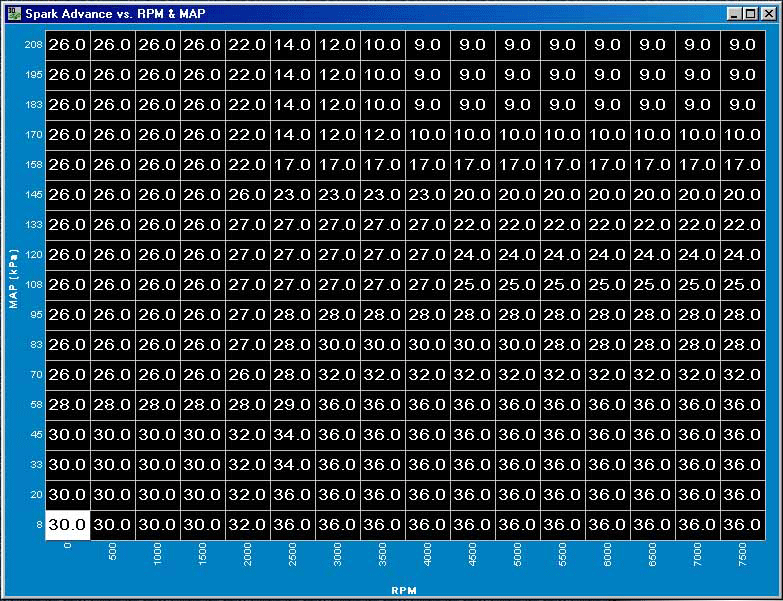
A few things of interest:
1. Notice that to eliminate pinging at 15 psi, we had to drop the timing down to 9° and max out the a/f ratio. This is on 91 octane pump gas, so I suppose this is to be expected. It does make me want to take a long, hard look at water/methanol injection, as I'm sure it would allow me to run more timing and more boost...but it's also an additional complication in an already complicated setup, and it raises some fears about what would happen if the water injection failed at a key moment.
2. Dan was able to fine tune some other areas of the fuel map for fuel economy (the cells with the 14:1 a/f ratios.
3. I drove the truck hard for seven hours yesterday (2.5 hours in each direction to his shop, plus 2 hours of tuning time), and it drove like a champ. That may not seem like a big deal to some folks, but if you've been following my progress with this motor, seven hours of hard driving is a real confidence builder ;-)
Maybe I'll have some new dyno numbers in the next post...
Spent a few hours with Dan Fodge yesterday tuning the truck (Fodge Engineering, 3250 Unit H, Monier Circle, Rancho Cordova CA, (916) 851-9111). We didn't do any dyno pulls, but we did do about 2 hours of road tuning. The motor is now running very well -- 15 pounds of boost with no pinging, and plenty of acceleration, and max EGTs of ~1510°F under sustained boost. This is a stable and workable tune. Hooray!!
I'm posting some screen shots of the air/fuel, volumetric efficiency, and spark tables because someone may be curious.
A few things of interest:
1. Notice that to eliminate pinging at 15 psi, we had to drop the timing down to 9° and max out the a/f ratio. This is on 91 octane pump gas, so I suppose this is to be expected. It does make me want to take a long, hard look at water/methanol injection, as I'm sure it would allow me to run more timing and more boost...but it's also an additional complication in an already complicated setup, and it raises some fears about what would happen if the water injection failed at a key moment.
2. Dan was able to fine tune some other areas of the fuel map for fuel economy (the cells with the 14:1 a/f ratios.
3. I drove the truck hard for seven hours yesterday (2.5 hours in each direction to his shop, plus 2 hours of tuning time), and it drove like a champ. That may not seem like a big deal to some folks, but if you've been following my progress with this motor, seven hours of hard driving is a real confidence builder ;-)
Maybe I'll have some new dyno numbers in the next post...